Final Updated Card Collection

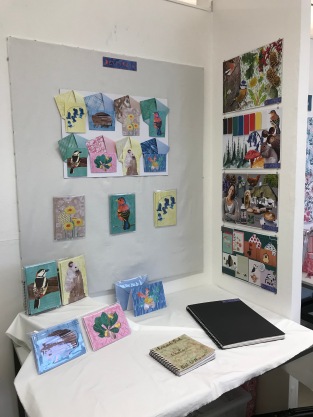
My final updated cards are a much cleaner and simpler version of what I previously handed in, and I think that they are a lot more sophisticated, tidier and commercial than before.

3riQioRyTbaEOl2tLLz5cg
Dandelion and Bluebell

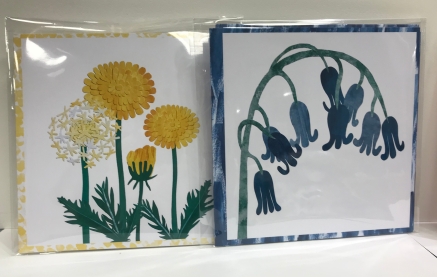
The dandelion and bluebell designs are a very similar layout to the previous ones, but the hand-cut element gives them more personality and character, even though the shapes and imagery are essentially the same.


SNkJVzdTROCiiC9QEs6krg
Oak and Horse Chestnut

Again, with the tree designs, the layout of them is very similar to the previous designs, but with a cleaner background that makes the eye focus on the design rather than the background.

bpwrM17JSoWU9QvzzHoNSQ
Hedgehog and Woodmouse

The animal designs have changed more, where I have done entirely new drawings, with the animals in different positions. Because I drew them in a few different positions and angles, it gave me the option to choose what looked best, rather than just going for the first thing that I draw. I am really pleased with these, as I think the designs are a vast improvement on the previous designs. The animals have more character, and seem more alive!

jlge8ttUTY6ACfsBHbfvxQ
Great Spotted Woodpecker and Chaffinch

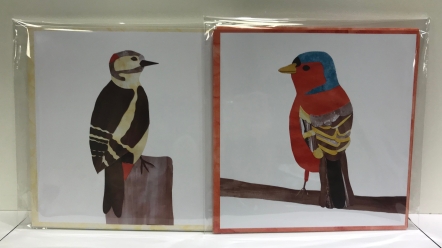
I also think that the bird designs have improved, as I did multiple drawings again. The details have been simplified, but you can still tell what sort of bird they are. I really like the simplicity of the whole collection of new designs and the border that ties in with the illustration finishes each card off. Each card has a corresponding envelope with a mark making pattern on the outside, which matches the border design of the card, and this really brings the card collection together and finishes it off.


This slideshow requires JavaScript.

Additional Sketchbook Work

In order to improve my card collection for Consultancy, I went back to drawing and cutting paper by hand, rather than laser cutting. By doing it by hand, it adds more personality to the imagery, as it is not so perfect, and it was less like putting a jigsaw together for me! I experimented with various drawing techniques, including continuous line, to get my drawing freely and feeling more relaxed. When I felt I had done enough drawing for each card subject, I moved onto cutting paper, creating multiple of each subject (i.e. lots of leaves and conkers etc.)

This slideshow requires JavaScript.

I chose what I thought was the most successful cutting for each subject to go on my new and updated cards, and I think just going back to drawing and cutting by hand (and not using technology!) the imagery has a much lovelier feel to it, with a more personal feel.

Final Updated Mood Boards

Below are my final updates on my mood boards for the ‘Consultancy’ brief. I changed them again because the first edit was too far the opposite way – I had gone from too busy to too blank! I kept my boards to squares this time, as it gives them a clean, tidy feel; and keeping the backgrounds the same also gives all the boards a coherent feel too. I am pleased with them, as each one clearly shows what I intended for it to show – you can tell exactly the theme and customer etc. They give the feel of the collection while showing the style that the cards will feature, and I think they are a big improvement on all the previous versions of the boards!

new theme
Theme
colour board
Colour
client board
Customer
competitor board redone
Competitor

Consultancy Surgery Tutorial

During my tutorial this morning, we discussed what I have already done to improve my consultancy project, and what I still need to do to further improve my grade.

There are still a few changes that I need to make to my mood boards, as I’ve managed to go too far the opposite way and not have enough on them, whereas they were too busy beforehand.

Everything else discussed was as I expected, as it was parts of the feedback that I have not yet started working on, but it was agreed that I need to set aside a big block of time, perhaps a weekend or two, to get everything done so that it’s out of the way and I can focus on the final module. I am going to do some more drawing, and then re-design my cards and envelopes, and then get them printed on a better quality card and paper, to bring the presentation aspect up even further.

Updated Mood Boards

In my formative feedback, it was mentioned that my all of my boards needed improving at varying levels. I added a background of faded mark making that I did myself throughout the module, which links all four together. Ordinarily, this wouldn’t happen because in the early stages of a project, I wouldn’t have this resource to use, but I thought as I did, why not?

In the theme board, I took quite a bit of imagery out, leaving bigger spaces, and only using what is essential to get my theme across, rather than filling the space with lots of images. I added more paper cut/collage pieces, to get across the technique that I used. I think this looks much better, cleaner, fresher and much more cohesive as a board.

new theme 2
Theme Board

Similarly, I took images out of the colour board to pare it down and simplify it, only leaving in essential images. I also changed the colours to match those on the outside of the envelopes in my collection, as they represent the colours used across the collection much better than the originals (these matched the non-watered down paint). I also made the colour blocks all the same size, making it look neater. There is a creamy coloured block that is very difficult to see, but on the physical board, the colours will be 3D, making it much more obvious.

colour board new 2
Colour Board

Again, with the customer board, I took out quite a few images, making it simpler like the other boards while still getting across who my customer is and what they enjoy.

client board new 2
Customer Board

I didn’t change much on my competitor board, just the background and one of the competitors. I swapped out Cath Kidston for Clover Robin, a paper cut/collage artist who sells cards and prints, who suits my market much better.

competitor board new 2
Competitor Board

All in all, I think my boards are much improved, and they have become simpler but more telling of what they are about.

Reviewed Visual Presentation

After receiving feedback at the start of term on my work for the consultancy module, I decided to play around with the visual presentation of my collection, as this was one of the points picked out, that my presentation was very basic and not professional enough. I decided to improve this at the start of this term as the work was still up, making it easy to play around with.


img_2884
Original Presentation


I moved the mini board onto my board, to bring it in line with the rest of the collection, rather than it looking quite separate. Already, this made a big difference with the collection looking finished and more flowing. I will also change the mini board to make it tidier, bringing the envelopes in so they are not hanging over the edges. My mood boards remained in the same place, and are going to be improved, but I have not got around to changing them yet, hence the old mood boards still being up. I like the position of them, as the wall is the perfect width to fit the boards on!

i9gyX5NdSsusnFGH32x4cA
New Presentation
29FGpo%YSyyS0t9Vgs4OlQ
New Presentation

I also added cellophane packaging to my visual presentation, and I was at first doubtful of this, as it meant that the insides of the envelopes weren’t visible, but I realised that it was ok as they are visible on my mini board. I think this makes the cards look a lot more professional, and the lack of pins on those on the board also adds to this. Using a plinth to vary the height of the cards also added some interest to the presentation, with the shine of the cellophane packaging giving it that professional finish.

I think this way of presenting my collection works a lot better, as it looks much more professional and clean. It’s much more cohesive, with everything in the sitting in the corner, rather than the mini board sticking out from the board on the left.

Reflection on ‘Consultancy’

In terms of personal development, I think this brief has been really successful for me. At the start of the term, I wanted to do something that I hadn’t really done before, and what I was imagining in my head wasn’t what was coming out. I wanted to get away from the style that I used in Making Connections in second year, because towards the end I really didn’t enjoy it. So in my head, anything vaguely similar would bring the negative from that brief with it. The turning point during this brief was when I decided to try some paper cutting (I can’t even remember now what gave me the idea!), and I really liked the look and playfulness about it. So I produced a few more paper cut images in time for the interim critique and presented both styles of work I had created, but the preferred was paper cutting, I think because it was quite obvious I was more happy with the paper cuts than the watercolour/fine liner work.

It was suggested at the interim that I changed my colours to brighter ones, not necessarily natural. I took this advice, and I think it was another turning point in the brief. Sarah said that it would be much more commercial, with people more likely to buy it, and I can definitely see that now; if I’d stuck with my more autumnal colours I would have struggled to create nice looking designs.

I have enjoyed learning how to use the laser cutter this term, even with some of the technical difficulties that Steve and I had fun fixing! However, I think I’m going to go back to paper cutting next term because it was suggested to me last Thursday that the paper cutting has more of a personal playful feel to it than laser cutting, because the edges aren’t perfect and it won’t be exactly precise. The reason I liked laser cutting was because of the perfect edges but I understand why it was said, and the paper cuts that I first did do have that more playful feel. I think I went to laser cutting because I was stressed about time and it seemed quicker (I don’t think it was in the end because of all the technical preparation in illustrator!). With paper cutting, the paper can be used more sparingly, cutting right to the edges, whereas the laser cutter sort of decides where it’s going and I had to give a bit of space between each piece to allow for the paper accidentally moving. This is important to me because I don’t like wastage and feel quite passionately about the environment! All the papers that I painted were (sort of) recycled, being either from the backs of old sketchbooks dating right back to A Level or from the ‘Craft Cupboard’ at my parents – which now only ever gets opened when I’m home! 😦 I hope that I can do similar or find recycled paper for next term and hopefully whatever my final designs end up on will also be ethically sourced and environmentally friendly.

Overall, I am pleased that I managed to pull this off, and even though I already know that there are a few adjustments to be made, I am happy. I’ve learnt quite a lot about myself and my style, I know that I need to stop procrastinating and get on with things to stop getting so stressed out – but I also know that once my dissertation is handed in I’ll have less on my mind. I’m looking forward to the next module!

Presentation Space

img_2884
Studio Space

Above is a photo of my space that I set up ready for my presentation to the design group consultants on Thursday. I am pleased with it, as I thought I would struggle for room, but with my mood boards to the right, it gives me all the room on my board for seven of my cards and envelopes with the eighth on the table, so people are able to pick them up and be able to see the back of the card for example. I think using white fabric as a background suits my collection, as it brings out the brightness and freshness of the colours, and isn’t distracting. I am also glad that there was room to have both my sketchbook and portfolio open on the desk, inviting people to flick through, as well as my research book.

img_2885
Mood Boards – Theme, Colour, Customer, Competitor

Having my mood boards to the side has actually been quite helpful, as it has given me more space on my board, and I also think it is a quite appropriate place for them; as they aren’t too distracting, but are still displayed in a way where they’re easily visible.

Mini Board

I was worried about my mini board, because in my head it was going to end up looking very similar to the full size display. However, it ended up looking good! I think because they are positioned differently they don’t look too similar, and the mini board is almost smarter because the envelopes are all displayed in the same way, and there’s less white space, which I think helps pull it together as a collection.

Overall, I am very happy with my space and how it looks. My presentation on Thursday went well, and I was happy to hear only a few suggestions for improvements – a few of which I intend to do, but I am going to wait for the academic feedback before I do anything, to see what else I can do for the summative deadline.

BettyRuth Logo

I wanted to create a logo to go with my collection, that would feature on the back of my cards. I chose ‘BettyRuth’ because I don’t really like my surname so I didn’t want to use it! I have a few friends from school that call me Betty and my middle name is Ruth, creating BettyRuth. Initially, I was just playing around with different fonts to see what I liked and what suited my style best.

aq1E6iqYSnyJ4nNFihEnRA
Typed Logos

While I was in uni using the laser cutter, I had the idea of laser cutting it, using the font I had chosen as my favourite. This actually worked really well, and after playing around with colours and both the cut outs and left over negative space pieces, I choose the orange and blue design. The contrast of the colours and textures works really well and I feel that these represent my style and use of colour and texture.

aq1E6iqYSnyJ4nNFihEnRArs%r1ZlIRK+GYlDnP+NqWg

After scanning my chosen logo, I edited the vibrance, contrast and brightness slightly, just to get the perfect balance.

bettyruthlogo-e1513202305989.jpg
Chosen Logo